
In the previous exercise, we created security groups. It is time that we take the exercise to the next level by creating a Microsoft 365 group and adding users dynamically based on rules.
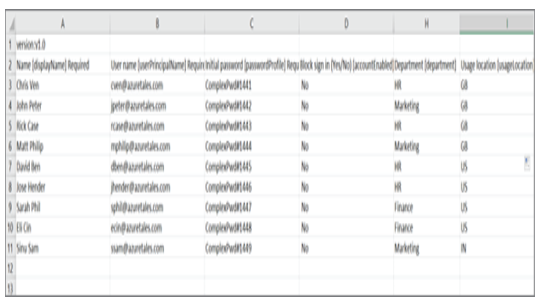
- Before you create the group, you need to add some new users using the bulk create method. If you cannot recall the process, perform the steps in Exercise 1.4 to accomplish bulk creation. The following is a sample file used for creation and note that here we are using the usageLocation and department headers to add the usage location and department of the users. These attributes will later be used to build our dynamic rules. Upload the file and create the users before you create the group.
2. As you performed in Exercise 1.6, you need to reach the New Group window and add properties as follows:
a. Group type: Microsoft 365 (as we need to create a Microsoft 365 group).
b. Group name: All HR (a group for all users whose department is HR).
c. Group email address: This is a required field as all Microsoft 365 groups should have an email address. You can add something like “all-hr” and the domain will be auto populated based on your tenant domain.
d. Group description: This field is optional; if you need to add a description about the group, feel free to add it.
e. Membership type: Dynamic User (as we are going to use dynamic queries to add users).
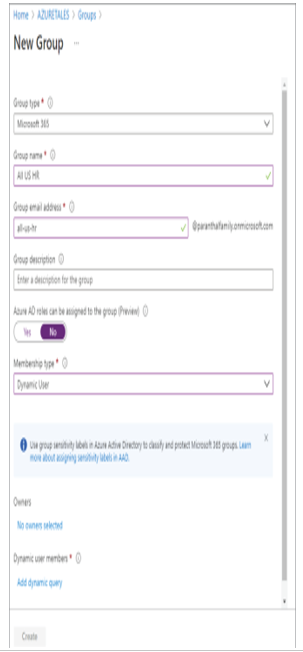
f. Owners can be selected in the same fashion as we did in the case of security groups (refer to Exercise 1.6 step 2.f).
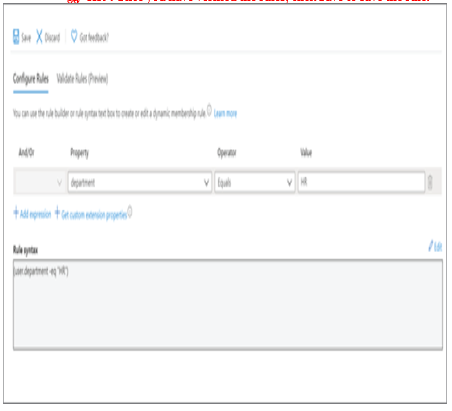
g. The next option is to define the dynamic query for the user. If you take a closer look at the previous graphic, at the bottom you can see there is an option to add a dynamic query. Click that, and you will be taken to the dynamic membership rules editor.
h. Based on the properties you are selecting, corresponding rules are created. In our example, we are adding the property “department” EQUALS “HR.” We can add more expressions by clicking Add Expression.
i. Azure Portal will automatically generate the rule syntax based on our selection. The rule syntax for what we selected here is user.department -eq “HR”. Once you have verified the rules, click Save to save the rule.
- Wait for a couple of minutes, and the members of the group will be automatically added based on the rule you configured.
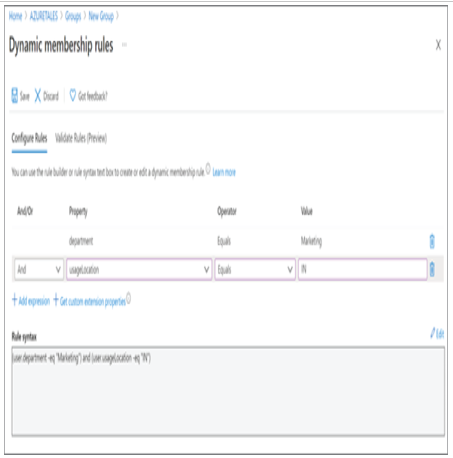
4. Let’s try to create another group called India Marketing where we will set up the rule using an additional expression. The final syntax will be (user.department -eq “Marketing”) and (user.usageLocation -eq “IN”), as shown here.
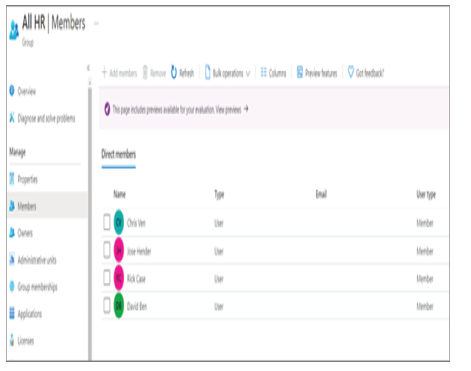
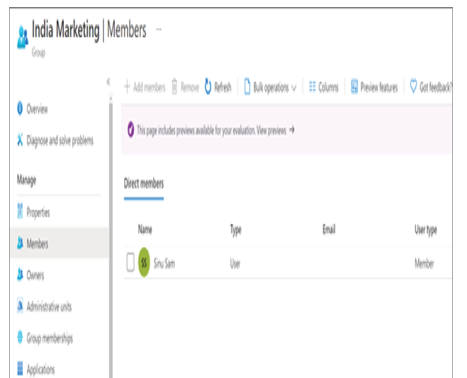
5. You will see that the members matching the rule are added to the Members blade
If you completed both the exercises, by now you know how to create security groups and Microsoft 365 groups. Now let’s see how to delete or modify the existing groups.
Leave a Reply