Microsoft AZ-104 Certification Exams - Identity: Azure Active Directory

Category: Deleting and Modifying Users Page 1 of 2

Azure Active Directory – Identity: Azure Active Directory

As mentioned in the introduction of this chapter, Azure AD is Microsoft’s cloud-based identity and access management (IAM) solution. Azure AD is an especially useful solution for IT admins, developers, and subscribers of various Microsoft solutions (such as Microsoft 365, Dynamics 365, and Azure). Primarily, Azure AD deals with helping employees to sign-in to various resources such as O365, M365, Dynamics, Azure, etc. However, the integration does not stop here; you can integrate Azure AD as the IAM solution for third-party applications and your internal applications as well. Developers are constantly working on integrating Azure AD as the IAM solution because of the increased reliability it provides. Since this book is about Azure administration, we will focus on how Azure AD is intended to help IT admins.

Benefits

Let’s explore the different benefits of Azure AD and why organizations should consider Azure AD as the IAM solution.

SSO to Cloud and On-Premises Applications  Having too many credentials for different applications increases the complexity and results in a higher chance of human error because an SSO solution will help users to sign in to all cloud applications, on-premises applications, and devices using their corporate credentials. Azure AD is not only meant for Microsoft Stack, but for thousands of SaaS applications such as Dropbox, ServiceNow, DocuSign, etc.

Easily Extend On-Premises Active Directory to the Cloud  When organizations move from on-premises to the cloud, there is a need to synchronize the users with the cloud. Otherwise, users will end up with two credentials, one for on-premises and another one for the cloud. To avoid this scenario and to provide a seamless SSO experience, Azure AD allows administrators to synchronize users, groups, passwords, and devices across both on-premises and the cloud. This is accomplished using a tool called Azure AD Connect that needs to be installed on your on-premises domain controller or any other domain-joined server with Windows Server 2012 or later, and it will help with the synchronization.

Cross-Platform Support  Regardless of what platform the user is using, be it iOS, Android, Windows, Linux, or macOS, the sign-in experience is going to be the same, and the users can sign-in to their applications using their work credentials.

Increase Security of Your On-Premises Applications  You can use the Azure AD Application Proxy service to access your on-premises applications via a secured remote access. The best part is you do not have to expose any additional ports on your on-premises firewalls; the access is managed by application proxy endpoints. The access can be tightened using multifactor authentication and conditional access policies.

Better Monitoring and Data Protection  Azure AD amplifies the overall security posture of your environment by providing unique identity protection features. Azure AD Identity Protection comprises several features including suspicious sign-in activity, risk alerts, etc. These triggers can be further integrated with conditional access policies to make business decisions. In addition to these capabilities, administrators can leverage security reports, sign-in activities, and potential vulnerability reports that are available off the shelf without the need to deploy any additional components.

Self-Service Capabilities  If you have worked as an IT administrator, you know most of the calls to the help desk will be regarding password resets. Azure AD offers a feature called Self-Service Password Reset by which users can reset their own passwords with the help of an authentication method such as phone, email, security questions, or a combination of these. IT admins need to enroll users into the SSPR program before they can use this feature. Enrolling is also self-serve, and the user will be prompted to verify the authentication methods. Enabling SSPR in your environment can elevate the security and reduce help-desk engagements.

If you are using Office 365, Azure, or Dynamics 365 in your environment, knowingly or unknowingly you are interacting with Azure AD to complete the authentication process.

We have been talking about Azure AD for a while now, and it is time that we understand the concepts that are part of Azure AD.

Concepts – Identity: Azure Active Directory

Understanding the various terminologies that are related to Azure AD is the first step in learning Azure AD. The following are the Azure AD concepts:

Identity  An object that can interact with Azure AD and get authenticated is called an identity. A user is an exceptionally good example of an identity; to get authenticated, a user will present the username and password to Azure AD. Upon receiving these credentials, Azure AD will substantiate and confirm if the authentication was successful. Servers and applications can also use their identity to authenticate with Azure AD; since these can be authenticated, they are also called identities. When it comes to servers or applications, they use certificates or secrets for completing the authentication.

Account  Any identity that has data associated with it is called an account. For example, if we take a user named John Doe, the user will have different data attributes associated to it such as user principal name, sign-in name, manager name, department, etc. All the data associated to the user identity will make the identity an account. Since identity is required for mapping these attributes, you cannot have an account without an identity. The account can be on-premises as well as in the cloud.

Azure AD Account  Usually known as work or school accounts, these accounts are provisioned in Azure AD or via other cloud services such as Office 365, etc. The data associated to these identities is stored in Azure AD and can be used to log in to services that use Azure AD as the authentication provider.

Azure Subscription  This is the container created in Azure to separate billing and environments. An account can have multiple subscriptions that can be used to create isolated environments and billing boundaries. Each subscription you create will be mapped to a tenant, and it is always a one-to-one mapping. You can always move subscriptions across tenants if you have a multitenant environment.

Azure AD Tenant/Directory  The term tenant means a single instance of Azure AD denoting a single organization. When you sign up for any Microsoft cloud service (Azure, O365, etc.), a dedicated instance of Azure AD is provisioned for you. There will be a unique name associated to this tenant that will have the suffix onmicrosoft.com and a unique ID assigned to the tenant called the tenant ID. An organization can create multiple directories/tenants for creating disparate environments or realms with different users and groups.

Now that we are familiar with the concepts related to Azure AD, the next question you will have in your mind is how Azure AD is different from Active Directory Domain Services.

Custom Domains in Azure AD – Identity: Azure Active Directory

Every tenant will have two properties that make it unique from other tenants created by other organizations (tenant ID and the tenant initial domain). By default, when you create a tenant, there will be a default domain that will look like <yourdomainname>.onmicrosoft.com. This initial domain cannot be changed or deleted once the tenant is provisioned. Because of the uniqueness of this domain name, sometimes you will not get the domain name that you are looking for. For example, when you try to sign up for a Gmail or Outlook mailbox, you get an option to choose a username. Though you have a choice, username allocation works based on the availability of the username. Sometimes you might try to get an email with your name, and you might end up with Gmail suggesting some usernames having random numbers because the one you asked for is not available. The same concept applies to the initial domains as well; if the name you request is taken, then you must append some letters or numbers to make the name unique.

 If the tenant was created while you signed up for the Azure subscription using your email address, then Microsoft Azure uses your email address and considers that as the initial domain name. You can create additional domains, and at that point you will get an option to choose the initial domain name. Refer to the “Managing Multiple Directories” section in this chapter to understand multitenant environments.

The problem with this approach is that all the users you create will have this initial domain assigned to their username. Since you have added letters and numbers to make it unique, this initial domain is hard to remember and not user friendly. To resolve this issue, you can use custom domains in Azure AD.

Using custom domains, you can use your domain that you created with the domain registrar. Adding custom domains requires you to validate and prove to Azure that you own the domain. This verification can be completed by adding a TXT/MX record to your DNS domain. The value for this DNS record will be given by Azure. When you add a domain to Azure AD, it will be unverified. After you add the DNS record to your DNS zone, you can initiate the verification request, and Azure AD will start querying your domain to verify if the value given by Azure is returned as the answer for the DNS query. Once the record is returned, Azure AD will mark the domain as verified, and you will be able to use the domain when you create users. You can have multiple domains and keep one of them as your primary.

Nevertheless, this is not a daily task for the administrators, and this is a one-time setup. In the future, if more domains need to be linked, then you may have to repeat the verification process. This topic is not part of the exam; however, understanding custom domains will help you set up your test environment with a custom domain. In this chapter, the exercises will have a custom domain name instead of the onmicrosoft.com domain name. I hope that this quick introduction of custom domains will help you understand why your test environment has an onmicrosoft.com domain and the exercises have a proper domain name.

If you would like to add your custom domain to Azure AD, please follow the process outlined in this documentation:

https://docs.microsoft.com/en-us/azure/active-directory/fundamentals/add-custom-domain

On that note, we will start with users and groups in Azure AD.

Users and Groups – Identity: Azure Active Directory

Users and groups are the primary objects of every IAM solution, and Azure AD also has a user and group management system, which is the backbone for access management. You have seen what an account is; just to refresh what we discussed; an account is an identity that has data associated to it. In Azure AD, you have user accounts and group accounts for managing users and groups. Let’s get started with user accounts and see the operations that are available for administrators.

User Accounts

As the name suggests, user accounts consist of user identities, which will be used by users to log in to services such as Azure, O365, Dynamics 365, SaaS applications, and other third-party applications that are integrated with Azure AD.

 You should create a subscription for testing all labs in this book. You can create a Free Trial subscription. If you are using your personal email address to sign up for the subscription, a new tenant will be automatically provisioned for you. All operations can be performed on that tenant.

Now that you know what a user account is, it is time to see how you can see users in our directory.

Viewing User Accounts

If you are working on a new directory that was set up for testing the exercises in this book, then you won’t have any additional users apart from the account that you used to sign up for the subscription. However, in a production environment, there will be hundreds of users. As an administrator, you will be asked to verify if the account exists in Azure AD or get information about a particular user. Hence, knowing how to view user accounts is particularly important in an IT admin’s daily job. We will follow a step-by-step process to view the users in your directory, as shown in Exercise 1.1.

EXERCISE 1.1
 Viewing Users in Your Directory  

  1. Open your browser (Microsoft recommends that you use the latest version of your favorite browser) and navigate to the Azure portal, which is available at https://portal.azure.com.
  2. A sign-in screen will be presented to you. Sign in using the email address that you used to create the subscription. The data you enter (username and password) will be sent to Azure AD. If the credentials are correct, then you will be logged in.

3. Now that you are in the Azure portal, you can click the hamburger icon at the top-left corner and click Azure Active Directory.  

4. Selecting Azure Active Directory will take you to the Overview blade of Azure Active Directory. This blade gives you some idea about certain aspects of your Azure AD such as the tenant ID, tenant name, primary domain associated to your tenant, edition of Azure AD, and number of users, groups, applications, and devices. If you scroll down, you will see more information such as your account, Azure AD connect, secure score, etc. The graphic here shows the overview of the tenant that is used for the demonstration.

If you take a close look at the graphic, you can see at the top the option that will let you create, manage, and delete tenants. These options are quite useful if you are managing a multi-tenant environment. One thing to note here is that deleting a tenant requires you to cancel all active Azure subscriptions that are part of the tenant. You cannot delete a tenant when there is an active Azure subscription associated with that tenant. Since we are working on user management, let’s shift our focus to the Users blade under the Manage section.

5. Once you click the Users blade, you will be presented with the All Users view. Your view might be different from what is shown here as it is displaying the users in the demo tenant.

6. If you click any user, you will be presented with the details of the user such as name, user principal name, job title, department, manager, etc., along with the creation date and last sign-in date.

In this section you saw how to view the existing users in the directory and find the details of a user. Now that you know how to find a user in the directory, let’s see how to add a new user to the directory.

Adding Users 2 – Identity: Azure Active Directory

Additionally, we need to keep a couple of points in mind while managing users.

  • You must be a Global Administrator of the tenant to manage the users. This is one of the Azure AD roles that we will discuss later in this chapter. The Global Administrator role is like a superuser role and should be granted to users who need to manage all aspects of Azure AD. There are other roles like User Administrator who can manage the users, but this can be used only for managing non-admin accounts.
  • While creating a username, the name and password are the only mandatory options. You have two choices with password. First, you can let the system generate a password for the user. The second option is to bring your own password. In both cases, the user will be asked to change the password during the first sign-in, and as an administrator, you should be finding a way to securely share the password with the new user. The commonly used method is to email the new user’s manager.
  • Even though the users can be deleted (will be covered in the “Deleting and Modifying Users” section), you can restore these users within 30 days from the deletion date.

Now that we are clear about the different user types and key points, let’s create users in Azure AD, as shown in Exercise 1.2.

EXERCISE 1.2
 Creating Users in Azure AD

  1. Navigate to the All Users blade inside Azure Active Directory. You can follow the steps 1–5 of Exercise 1.1 to reach the All Users blade.
  2. Once you are in the All Users blade, you can click the New User option.

3. Selecting New User will display a window to input details of the new user you intend to create. You will be presented with two options, Create User and Invite User.

  1. Selecting Create User will help you create a cloud identity that will exist only in Azure AD. On the other hand, if you select Invite User, you can invite a person from another Azure AD or a person who doesn’t have an Azure AD account (Guest user) via an invitation process. In this exercise, we will choose Create User as our plan is to create a cloud identity user type.
  2. Here the username, name, and password are the mandatory fields. You can fill in the fields First Name, Last Name, Department, Job Title, Contact Info, Profile Picture, etc., if you’d like; they are optional. In the previous graphic, you can see that we have left Password as “Auto-generate password,” which means that the system will generate the password for the user. You can see the password by enabling the Show Password option.
  3. Since we have filled the mandatory fields, we can click Create to provision the user. Within a couple of seconds, you will get a notification that the user is created, and the new user will be visible in your All Users blade.

You have successfully created a new user in the Azure AD. As of now, we have covered two exercises where you are viewing and adding users to Azure AD. As an administrator, your responsibility does not stop here; in your daily tasks you will be asked to delete users when someone leaves the organization, modify user attributes when they move to a different department, or change their location. To give you the idea of how to delete and modify users, let’s head to the next section.

Adding Users – Identity: Azure Active Directory

In an enterprise environment, user insertion happens frequently, and cloud administrators are responsible for this. Whenever a new employee joins the organization, administrators are required to create their account, add the necessary licenses, complete their profile, set up their initial password, etc. In this section, we will add users from the Azure portal to understand the user insertion process. Before we start the exercise, it is important you know the user types that are available in Azure AD. There are three types of users in Azure AD.

Cloud Identities  As the name implies, these are identities that are created in Azure AD and exist only in Azure AD. In the upcoming exercise, we are going to create a user called John Doe in Azure AD. This user is going to be a cloud identity as the user will exist only in Azure AD. Another point to note here is that the user can be part of another Azure AD as in an Azure AD of another organization. For instance, assume that there is a company abc.onmicrosoft.com with a user called Jane Doe. Jane Doe can be added to another company’s Azure AD, say, xyz.onmicrosoft.com, through an invitation process also known as business-to-business collaboration. In this case, Jane Doe is a cloud identity of abc.onmicrosoft.com and she is added to xyz.onmicrosoft.com for collaboration. When Jane’s account is deleted from her primary directory (abc.onmicrosoft.com), her presence in the other directory is not automatically removed; we have to perform this action manually.

Directory Synchronized Identities  As mentioned earlier, one of the features in Azure AD is that you can synchronize your on-premises Active Directory to Azure AD. If you have an identity that is synchronized, then you will see Yes in the Directory Synced column for the user in the All Users view (Figure 1.1).

FIGURE 1.1 Distinguishing directory synchronized users

Guest Users  These are accounts that exist outside of Azure. These include Microsoft accounts (earlier known as Live accounts) or accounts from other identity providers and accounts from other organizations. The identities are not part of your organizational Azure AD; they need to be invited to your tenant for collaboration. These accounts will be shown as Guest if you look at the User Type value of the user (refer to Figure 1.1). Once the collaboration is no longer required, you can delete these accounts from your user list, and the access will be revoked.

Azure AD Join – Identity: Azure Active Directory

Single sign-on is one of the features offered by Azure AD. You can use SSO on devices, apps, and services from anywhere in the world. Joining devices to Azure AD assures the corporate devices are protected and that they follow the compliance standards set by the organization. Users can bring their own devices and join them to Azure AD, and administrators can make sure that these devices also follow the standards of your organization. Now, we will look at the benefits of Azure AD Join.

Benefits

Azure AD Join has the following benefits:

Single Sign-On  This is the primary feature of AD Join; you can sign-in to any of your applications and services without a username and password prompt. The best part is it is not necessary to connect to the domain network to use SSO.

Enterprise Client Roaming  The settings are synchronized across devices that are joined to Azure AD.

Microsoft Store for Business  Joining your device and signing-in to the store with work or school accounts gives you a customized catalog of applications that are shared by your organization.

Windows Hello  This provides you with biometric authentication using facial recognition or fingerprints to access corporate resources and sign-in to devices. The devices should have hardware that supports Windows Hello to use this feature.

Block Access  Administrators can enforce policies and devices that do not meet the requirements can be easily blocked.

Let’s see what connection options are offered by Azure AD Join.

Connection Options

You can connect your devices to Azure AD using the following options:

Register to Azure AD  Registration creates an identity for the device, and this identity can be used for authentication. Whenever a user signs in, the identity of the device can be used for authentication. Administrators have the right to enable or disable this identity.

Join to Azure AD  Joining to Azure AD provides the same features as registration and additionally changes the local state of the device. With a change of local state, users can sign in to their device using their work or school account. Joining is more like an extension to the registration process.

Combining the registration process with Microsoft Intune (it is a mobile device management [MDM] solution) will help you create conditional policies using the device attribute. Using this combo, you can block devices that do not follow the organizational compliance standards. For example, you could block all devices that are using Windows XP or Windows 7 and make Windows 10 the prerequisite for accessing corporate resources.

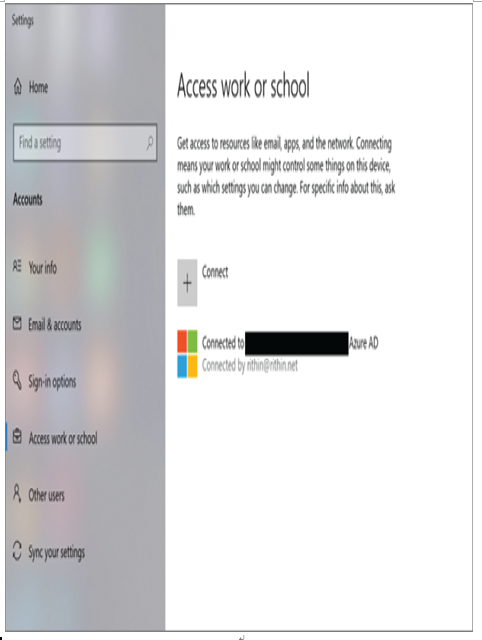
You could join your device to Azure AD by going to your Windows 10 Settings ➢ Accounts ➢ Access To Work Or School. Signing in with your work or school account will connect your device to the Azure AD domain, and you can sign in to corporate resources using SSO. Figure 1.7 shows how a connected device looks.

FIGURE 1.7 Connecting a device to Azure AD

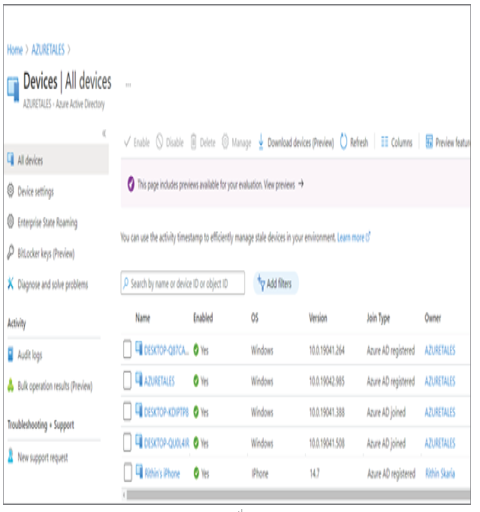
All the devices that are connected to Azure AD can be explored from the Azure Active Directory ➢ Devices blade. This blade will show OS information, OS version, join type, and owner of the devices that are joined (refer to Figure 1.8).

FIGURE 1.8 Listing all devices connected to Azure AD

Now we will talk about a lifesaver for administrators: self-service password reset. Using self-serve options reduces the incoming requests to the IT help desk so administrators can utilize their time for more productive work.

Self-Service Password Reset – Identity: Azure Active Directory

If you have worked at an IT help desk, you know most of the calls are for user password reset. Self-service password reset (SSPR) allows users to reset their passwords using a set of authentication methods set by the cloud administrators. Self-service password reset is always enabled to administrators to avoid lock-out scenarios. Admins need to use two authentication methods for password reset.

Enabling SSPR

Cloud administrators need to enable SSPR options for users or groups as this option is not enabled by default. To enable this feature, you need to have the Global Administrator role in the tenant.

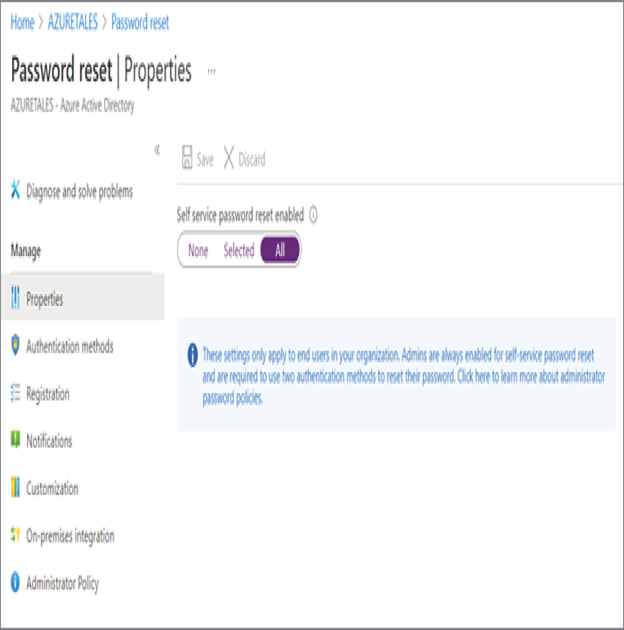
SSPR can be enabled from Azure Portal ➢ Azure Active Directory ➢ Password Reset. SSPR provides three options (refer Figure 1.9).

  • None: SSPR is not enabled.
  • Selected: SSPR is enabled for selected groups.
  • All: SSPR is enabled for all users in the tenant.

Once SSPR is enabled, users need to register for SSPR. Azure will automatically redirect users to the registration page on first sign-in after SSPR is enabled. Users can always navigate to https://aka.ms/ssprsetup to set up their authentication methods or to change them in the future. For example, you might have registered with one phone number when you enrolled for SSPR, but you changed your phone number. In this case, you can change it by going to the SSPR setup page.

FIGURE 1.9 Enabling SSPR

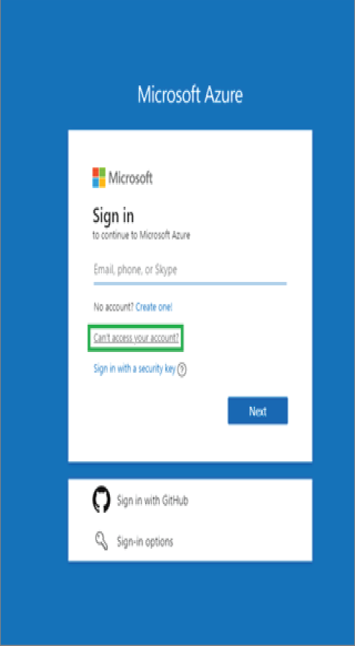
Registered users can always reset the password from the sign-in page by clicking “Can’t access your account?” as shown in the Figure 1.10.

It is not necessary that you navigate to Azure Portal to click “Can’t access your account?”; you can navigate to any sign-in page that uses Azure AD login like Office 365, Dynamic 365, SharePoint, etc.

Users can also navigate to the reset page directly by going to https://aka.ms/sspr. This is an alias for the following:

https://passwordreset.microsoftonline.com

Now that you are familiar with SSPR setup, let’s see what authentication methods are available for the users and how administrators can control these methods.

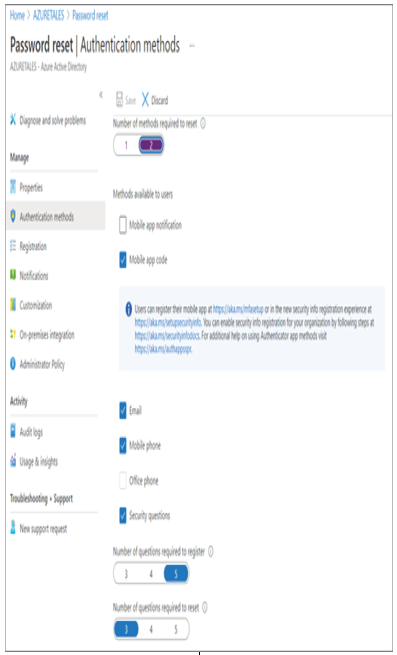
Authentication Methods

The administrator can choose the number of authentication methods required to reset the password and the number of methods available for users.

FIGURE 1.10 Initiating password reset

For a successful reset operation, you require at least one authentication method. Nevertheless, it is always better to have a secondary method. For example, if you set up SSPR with an email method, and if the user has no email access, then the user will not be able to reset the password. Here, it is better to have a second option like a mobile phone so that the user can receive the code as a text message and complete the authentication.

Methods available include the following:

  • Email notification
  • Text message to mobile phone
  • Text message to office phone
  • Mobile app notification
  • Mobile app code
  • Security questions

In the case of security questions, the administrator can decide how many questions need to be registered and how many of them need to be answered to reset the password. Nonetheless, security questions are considered less secure as the answers to these questions can be guessed if the intruder or hacker knows the user personally. Attackers can also collect answers for these questions via social engineering.

Authentication methods can be configured from Azure Portal ➢ Azure Active Directory ➢ Password Reset ➢ Authentication Methods (refer to Figure 1.11).

FIGURE 1.11 Configuring SSPR authentication methods

So far, we concentrated on a single-tenant environment; in real-world scenarios there will be different tenants, and admins are responsible for the management of these tenants. Let’s see why we need multiple directories and what benefits it provides.

Managing Multiple Directories – Identity: Azure Active Directory

Each tenant represents an organization, and it is a fully independent resource. Every tenant that you create is logically separated from other tenants that you manage in a multitenant environment. Even if you are the common administrator for all these tenants, there will not be any parent-child relationship between these tenants or directories. Resource independence, administrative independence, and synchronization independence are there between the tenants.

Resource independence is when you create or delete a resource in one tenant; this action will have no impact on any other resource in another tenant. However, there is a small exception that we discussed in the case of cloud identities from external AD. By default, Azure AD doesn’t delete Guest users when they are deleted from their home tenant; however, we can set this up manually.

Administrative independence is when a non-admin user (say the user’s name is John) of tenant A creates a new tenant, say tenant B.

  • John will be the Global Administrator of the tenant B as he created the new tenant. The user will be added as a user from external AD. Here it says external AD, because John is not from tenant B but from tenant A.
  • Administrators of tenant A have no control over tenant B. If the users of tenant A need to access or manage tenant B, then John must invite these users to tenant B and give the necessary role. One thing to note here is that if the admins of tenant A takeover John’s account, they can access tenant B.
  • Adding or removing an admin role in one tenant will not affect the role of the user in the other tenant. Here we’re not removing the user; we are adding or removing the Azure AD roles, which will have no impact on the other tenant, and all roles the user has in the other tenant will be retained.

When it comes to synchronization independence, you can set up independent synchronization on each Azure AD.

With that, we have covered all the topics that are within the scope of the exam.

Summary

In this chapter, we talked about the identity and access management solution in Azure: Azure Active Directory. We started the chapter looking at the benefits of Azure AD, and then we examined how Azure AD is different from the traditional Windows Server Active Directory deployment.

As we progressed, we spoke about Azure AD licensing and how administrators can set up custom domains. After that, we learned about user accounts and group accounts. This is a major element of this chapter; understanding user and group management is crucial for cloud administrators. If you are not confident with identity and access management, there can be a chance of security flaws. Security issues are not something welcomed in an organization as they can cause damage to the reputation of the organization, especially when you are dealing with customer data. Along with the impact on the reputation, this can also lead to revenue loss. As an administrator, you should excel in the identity and access management field.

Then we spoke about Azure AD roles and how administrators should put emphasis on the principle of least privilege. Several other key ideas were reviewed including AD Join and SSPR. You learned about the advantages of incorporating these features in your environment.

Toward the end of the chapter, we covered multitenant environments and the independence they provide in terms of administration, resources, and synchronization.

Like with security, implementing governance and compliance is crucial in setting up the environment. In the next chapter, we will cover governance and compliance.

Getting a Subscription – Compliance and Cloud Governance

You can get a subscription from multiple channels. You might not be eligible for all the subscriptions listed here; the eligibility is dependent on the terms and conditions of the respective offers.

Enterprise Agreements (EAs)  EA customers will sign an agreement with Microsoft or Microsoft Partners and make an up-front monetary commitment to Azure. All usage incurred will be charged against the monetary commitment; when the commitment expires, the customer will start receiving invoices. You can make the prepayment again and continue using the services. The advantage of using EAs is that they offer more discounts than other offers as the customer is paying the amount up front. If your organization is looking for massive deployments in Azure and requires 99.95 percent monthly SLA, then an EA is the best option.

Web Direct  In web direct, customers can directly go to the Azure website and purchase a new subscription. If you prefer, you can sign up for a Free Trial subscription and upgrade if you are interested in continuing the service. You won’t be charged until you upgrade the subscription from Free Trial to Pay-As-You-Go. Once you upgrade, as the name implies, you will be charged as per the charges mentioned in the Azure public-facing documents. There are no discounts available for you in this case, and you will require a credit card to sign up for this subscription.

Reseller  Using the Open Licensing program, customers can buy tokens from resellers and sign up for an Azure-in-Open subscription. As a customer, you can buy a token for any amount you need; the charges incurred will be taken from this amount. When the amount is exhausted, you need to buy a new token and refill your account to avoid service interruption. This works like a prepaid cellular plan.

Partners  You can purchase an Azure subscription from partners, and they can help you with the cloud transformation. The partners will be your first point of contact for any Azure-related concerns as the agreement is signed between the partner and the customer. These types of subscriptions are called cloud solution provider (CSP) subscriptions, and every month you’ll receive an invoice from your partner based on your usage. Microsoft doesn’t play any role in the invoice generation as you don’t have any direct billing relationship with Microsoft. CSP subscriptions offer more discounts compared to the Pay-As-You-Go subscriptions and are ideal for organizations that don’t have the budget to make the up-front monetary commitment for an EA.

This is not the complete list of offers that are supported by Azure. There are other offers that come with credits for MSDN subscribers and Visual Studio subscribers. You can see all the available offers here:

https://azure.microsoft.com/en-in/support/legal/offer-details

Now that you have an idea about the common offers, let’s see how the metering or usage is done in these subscription offers.

Page 1 of 2

Powered by Dianne & Theme by Diannehill