Microsoft AZ-104 Certification Exams - Identity: Azure Active Directory

Category: Exams of Microsoft AZ-104 Page 2 of 3

Deleting and Modifying Users – Identity: Azure Active Directory

As mentioned in the previous section, whenever someone gets promoted, moves to a different department, or changes their work location, these details need to be updated on the user profile. Though these fields are not mandatory, they will be important in understanding more details about the user. Assume that there are two John Does in your organization—one works for HR and the other one works for IT. Adding department details here will help the administrator to perform the operations on the right user. In Exercise 1.3, we are going to modify the user we created in Exercise 1.2 and then delete the user.

EXERCISE 1.3
 Modifying and Deleting Users

Let’s perform the update process on the user we created in Exercise 1.2. The tasks we have here are as follows:

  • Reset the password of the user to a new password.
  • Change the department of the user to HR.
  • Add the employee ID as 1322.
  • Verify the user details.
  • Delete the user.

The first step here is to navigate to the All Users blade as we have done in Exercise 1.1; you can follow these steps to update the user attributes:

  1. From the All Users blade, select the user John Doe by clicking the name; that will take you to a screen similar to the following one.

2. Since our first task here is to reset the password, you can click Reset Password, and you will be asked to confirm whether you want to proceed with the reset process. You must click again the Reset Password option, which will be visible in the right corner of the screen. To reset a user’s password, you need to be the Global Administrator. User Administrators, Helpdesk Administrators, and Password Administrators can also reset the passwords of non-administrative accounts. However, User Administrators, Helpdesk Administrators, and Password Administrators cannot reset the password of a Global Administrator. Password reset of the Global Administrator can be done only by another Global Administrator.

  1. Confirming the reset password option will display a temporary password on the screen. This needs to be changed on the first sign-in after the reset as this is a temporary password and an administrator is responsible for sending this password securely to the user.
  2. Now that you have reset the password, the next task is to update the department and employee ID. If you recall, we skipped these optional fields while creating the user, and it is time now to update them. To edit the user details, you can click the Edit button, which is on the left side of the Reset Password button.
  3. Clicking the Edit button will enable all the text boxes. Once you have updated the information, you can click Save. You can update all information except the object ID, which is a unique ID assigned to every identity by Azure AD.

6. After saving the details, if you go back to user profile, you will be able to see that all the data you entered is populated to the user profile.

7. From this graphic, we confirmed that the department details and employee ID have been added to the user profile. The next task is to delete the user. Assume that John Doe is leaving the organization and you have to deprovision his account. In the graphic, you can see that there is a Delete button next to the Reset Password button. Clicking Delete will ask for your confirmation.

8. Click Yes, and John Doe’s profile will be deleted. However, this is not a permanent delete action. All deleted users can be viewed from the Deleted Users blade.

9. You will have 30 days from the deletion date if you want to restore the user, using the Restore option. You can also delete the user immediately by selecting the Delete Permanently option instead of waiting for 30 days.

 All these actions can be also performed from the Office 365 Admin panel, PowerShell, or CLI if required.

In Exercises 1.1, 1.2, and 1.3 you have seen how an administrator can view, add, modify, or delete users. Performing these tasks one by one from the portal is not a great idea if you have a large user base. All the actions that you have seen in the previous exercises can be performed in bulk. In the next section, you will learn how administrators can leverage bulk operations available for user accounts.

Bulk Operations – Identity: Azure Active Directory

In an enterprise environment, new users are added, updated, or deleted in bulk. Performing these actions one by one for each user is a hectic task, and there is a higher chance of human error. You need to automate these tasks and should be able to perform these tasks in bulk. Azure AD provides bulk operations by which you can create, invite (for guest users), delete, and download users in your directory. These bulk actions are achieved via uploading a CSV file with the details. This file template will be available for download from Azure Portal itself. In the next exercise, you will use a bulk operation to create nine users (all Avengers characters) in a single shot, and once they are visible on the portal, you will perform a bulk delete operation. See Exercise 1.4.

EXERCISE 1.4
 Performing Bulk Operations

  1. Navigate to the All Users blade. If you are not able to recall the steps to reach the All Users blade, please follow steps 1–5 of Exercise 1.1.
  2. Select Bulk Operations and then select Bulk Create.

3. Selecting Bulk Create will let you download a CSV template. You need to download the template, fill in the details, and upload it to Azure AD for processing. Azure will prompt you with the steps.

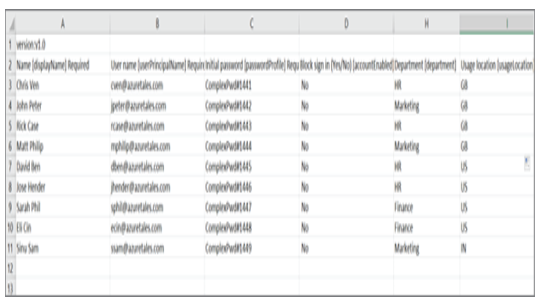
4. Once the file is downloaded, you can open it in Microsoft Excel and fill in the details. The headers will be auto populated; some of them are required, while some are optional. The fields that are required will have a [Required] tag in the header. The required fields are Name, Username, Initial Password, and Block Sign In. Fill in the template, as shown here.

  1. You can fill the optional details if required; however, it is mandatory to fill in the required fields; otherwise, the validation will fail.
  2. Let’s upload the file to Azure AD and see if we got it correct. You can use the upload option shown in step 3. If you closed the window after downloading the CSV file, you can click Bulk Operations ➢ Bulk Create and the upload window will be shown again. If the file is uploaded successfully, you will see a message on the screen. Once the file is uploaded, click Submit.

7. As soon as you click Submit, the status will change to “In Progress.” If the format is correct, then you will get a “Succeeded” message.

8. You can also verify the status of any bulk operation by navigating to the Bulk Operation Results blade. You will be able to troubleshoot from this blade if you get an error during the bulk operation.

9. Since our bulk operation was successful, let’s confirm if the users are visible in the All Users blade.

Similarly, you can perform bulk delete and bulk invite operations by downloading the corresponding CSV and uploading them back to Azure AD. Speaking about invitations, let’s see how external users can be invited to your tenant for collaboration.

 From the Deleted Users blade, you can perform bulk delete and restore operations if required.

Inviting Users – Identity: Azure Active Directory

In the “Adding Users” section, we discussed several types of users. If you recall, we talked about Guest accounts (Microsoft accounts and users from external Azure ADs). These users need to be invited to your tenant. Recipients can redeem the invitation and join your tenant for collaboration.

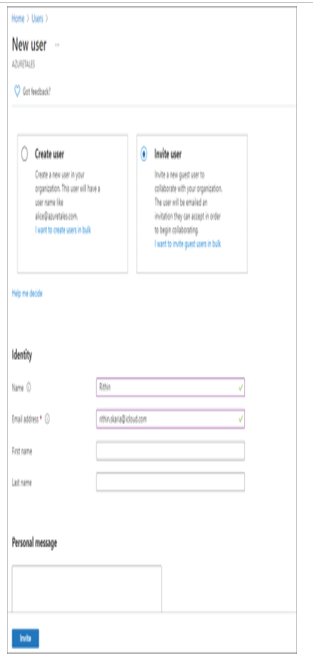
In the All Users blade, you have an option to add a new Guest user. Clicking New Guest User will redirect you to a screen similar to Figure 1.2.

FIGURE 1.2 Inviting users

 You can also add a guest user by clicking New User and then selecting the Invite User radio button instead of Create User.

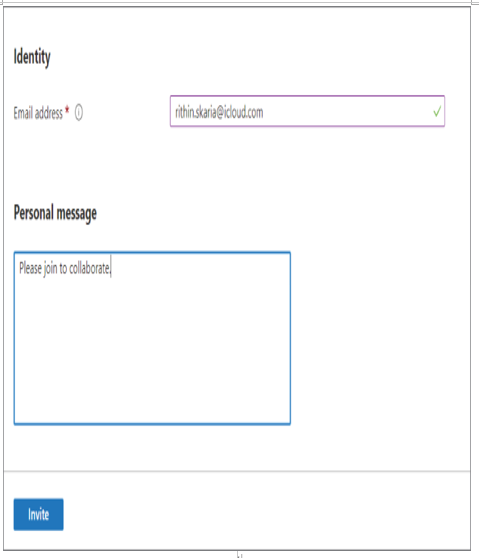
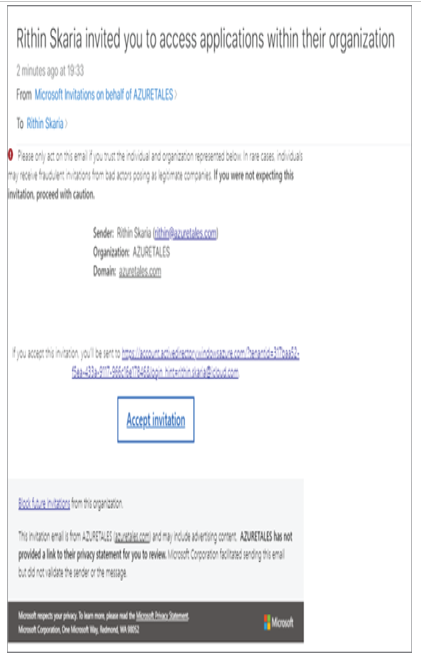
The only email address is the mandatory field, and you can even customize the personalized message. By clicking Submit, this message will be appended to the email invitation, which will be triggered to the recipient, as shown in Figure 1.3.

A sample invitation has been added for your reference (refer to Figure 1.4).

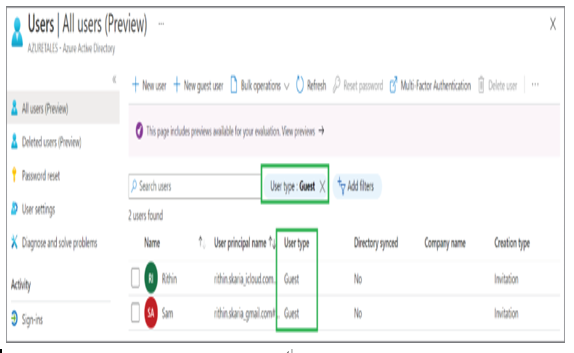
These users can be easily spotted in the All Users blade by looking at the User Type column. You can further add a filter in the blade as shown in Figure 1.5 to list all the Guest users in your tenant.

FIGURE 1.3 Customizing the invite

FIGURE 1.4 Invitation for Guest user

FIGURE 1.5 Filtering Guest users

So far, you have been working on user accounts and different operations that administrators can perform for managing users. Basic administrative tasks are limited not only to user management but can include group management as well. In the next section, we will talk about group accounts in Azure AD.

Group Accounts

When it comes to access management, applying permissions or roles to each user one by one is cumbersome, so to solve this complexity, we have groups in Azure AD. We can group users to create group accounts and then apply the permissions or roles to the group so that all members of the group get that access. Group accounts make access management easier. You can also synchronize groups from on-premises to the cloud, the same as with users.

Azure AD allows you to create two types of groups, security groups and Microsoft 365 Groups. Let’s understand the differences between these types.

Security Groups  Groups play an inevitable role in access management. Security groups can be used to control access to resources easily. For instance, you can create a security group called All HR and give access to all HR-related resources. As an administrator, the advantage here is you do not have to manage individual access; this can be controlled at the group level. Security groups require the Azure AD administrator to perform management actions.

Microsoft 365 Groups  Microsoft 365 groups serve the same purpose as security groups; however, they provide additional capabilities such as access to a shared mailbox, shared calendar, SharePoint, and more. You can extend the collaboration and provide access to external users as well. Unlike security groups, both users and admins can use Microsoft 365 groups.

Another point to understand here is about membership to groups. You can add users as well as groups (nested groups) to a group as members. The rights can be accessed in three diverse ways, as follows:

Assigned  This one is straightforward; this will let you add users (or groups) to the group as members. This type of addition is also known as direct membership.

Dynamic User  Group memberships are controlled using member attributes; using them we can dynamically add or remove users from a group. For example, you can have a rule like if the department of a user is HR, then that user should be added to the group All HR. Here Azure constantly reviews user attributes. If a new user is added with the department as HR, then Azure will add that user to the All HR group. Similarly, when someone leaves the department, Azure automatically removes the user from the group. This is especially useful for administrators, as they do not have to remove or add access whenever a new user is added or removed; but they must make sure that the attributes are added to the user correctly.

Dynamic Device  This is applicable only in the case of security groups and is like the dynamic user concept. The primary difference is that instead of looking at the user attributes, here you are looking at the device attributes. You can register or join our devices to Azure AD, and based on the device attributes, the group membership can be controlled; we will cover AD Join later in this chapter.

Now that you are familiar with the membership types, let’s go ahead and perform some hands-on tasks related to groups.

Viewing Groups – Identity: Azure Active Directory

In Exercise 1.5, you will see how you can view groups in Azure AD.
If you are using a new setup, chances are you might not see any groups in your environment. This is fine; the purpose of the exercise is to make you understand how you can reach the Groups blade.

EXERCISE 1.5
Viewing Groups in Azure AD

  1. At this point, you should be familiar with the navigation in the Azure portal and how to reach the Azure Active Directory blade. Right below the Users option that you used earlier, you will be able to see Groups. Clicking Groups will take you to All Groups.
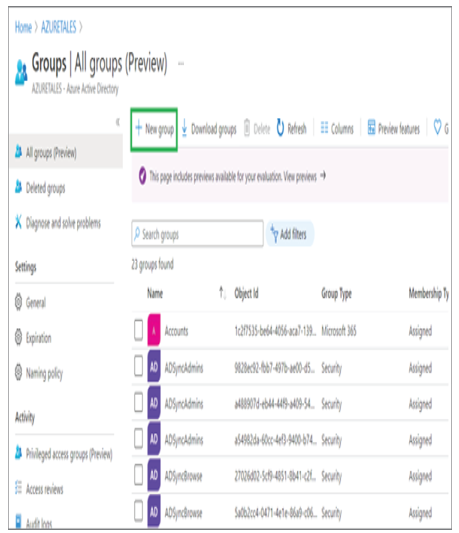
  1. If you take a close look at the graphic, you can see that this list provides a lot of insights about the listed groups. For example, you can see the group type (Security Group or Microsoft 365 Group), membership type (Dynamic or Assigned), group email (shown only for Microsoft 365 as there will be a shared mailbox), and source (synchronized from Windows Server AD or the cloud). These details are extremely useful in managing the groups and in understanding the properties of a group.
  2. Clicking any of the groups (you can skip this step if you do not have any groups in your environment) will give you a plethora of details about the group such as how many members are there, list of owners, group membership, device membership, etc.

Now that you know how to navigate to the Groups blade and find a group, let’s move on and see how you can add a new group.

Adding Groups
In this section, we will cover how you can add a new security group and Microsoft 365 group. In addition, you will see how you can work with dynamic rules and direct membership to these groups. Especially in Exercise 1.6, you will create a security group called Avengers and add the users we created in Exercise 1.4 via direct membership.

EXERCISE 1.6
Adding Security Groups to Azure AD

  1. Navigate to the Groups blade by following the steps mentioned in Exercise 1.5, and you will be able to see New Groups option.
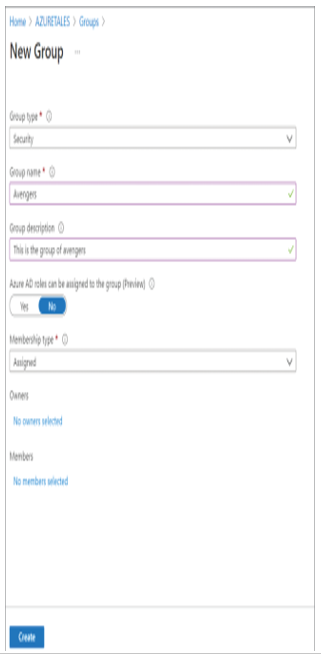
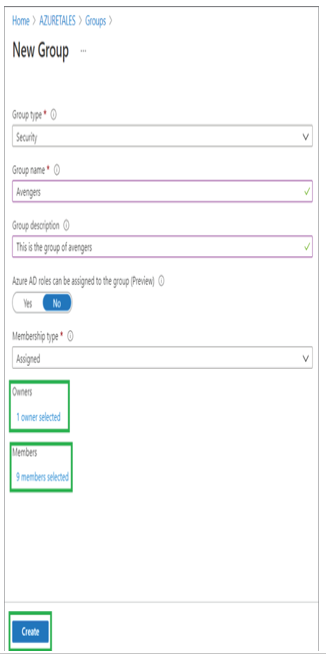
  1. Since our first task is to create a security group, you can see that we have selected the following options:
    a. Group type: Security (as we need to create a security group).
    b. Group name: Avengers (as we are going to add the Avengers users here).
    c. Group description: This field is optional; if you need to add a description about the group, feel free to add it.
    d. Azure AD roles can be assigned to this group: Yes, this setting needs to be enabled if you plan to assign roles to this group from an access management perspective.
    e. Membership type: Assigned (as we are going to perform direct assignment).

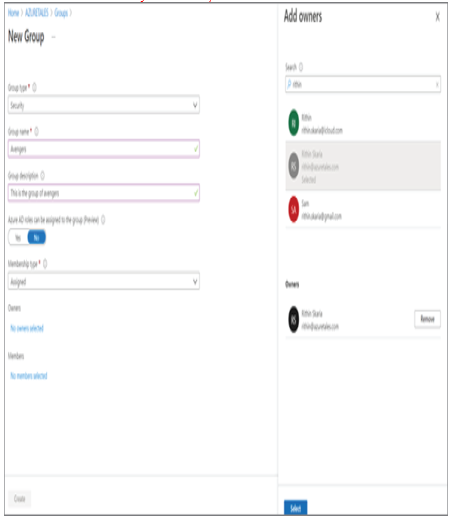
f. Owners: You can select the owners for the group. This set of users will manage the group such as adding or removing users. You can search users, and add once you are done, click Select.

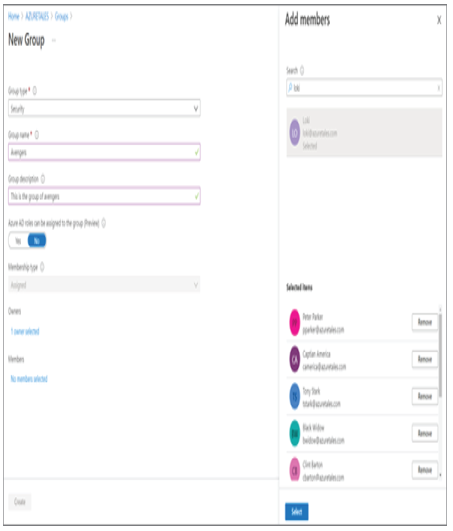
g. Members: This is the set of users who will be part of the group; we will select all users that we need in the group. Once they are selected, click Select to add members to the group.

  1. The new group window will now show the number of users you selected as owners and members. The next step is to click Create and create the group.

4. Navigate to All Groups and search for Avengers; you will be able to see the new group you created for our Avengers. Clicking the group name will reveal the properties of the group.

If you have followed these steps, then you have successfully completed the exercise to create a security group. Now let’s focus on Microsoft 365 groups and dynamic users in Exercise 1.7.

Security groups can also be created with dynamic memberships supporting both dynamic users and devices; we are going to use Microsoft 365 and dynamic users for demonstration purposes only. You can apply the same logic with security groups and dynamic users, if needed.

Adding Microsoft 365 Groups in Azure AD – Identity: Azure Active Directory

In the previous exercise, we created security groups. It is time that we take the exercise to the next level by creating a Microsoft 365 group and adding users dynamically based on rules.

  1. Before you create the group, you need to add some new users using the bulk create method. If you cannot recall the process, perform the steps in Exercise 1.4 to accomplish bulk creation. The following is a sample file used for creation and note that here we are using the usageLocation and department headers to add the usage location and department of the users. These attributes will later be used to build our dynamic rules. Upload the file and create the users before you create the group.

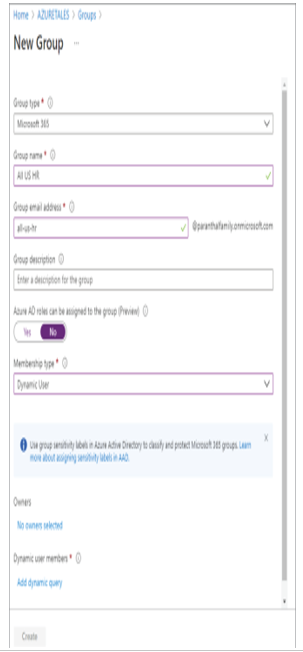
2. As you performed in Exercise 1.6, you need to reach the New Group window and add properties as follows:
a. Group type: Microsoft 365 (as we need to create a Microsoft 365 group).
b. Group name: All HR (a group for all users whose department is HR).
c. Group email address: This is a required field as all Microsoft 365 groups should have an email address. You can add something like “all-hr” and the domain will be auto populated based on your tenant domain.
d. Group description: This field is optional; if you need to add a description about the group, feel free to add it.
e. Membership type: Dynamic User (as we are going to use dynamic queries to add users).

    f. Owners can be selected in the same fashion as we did in the case of security groups (refer to Exercise 1.6 step 2.f).
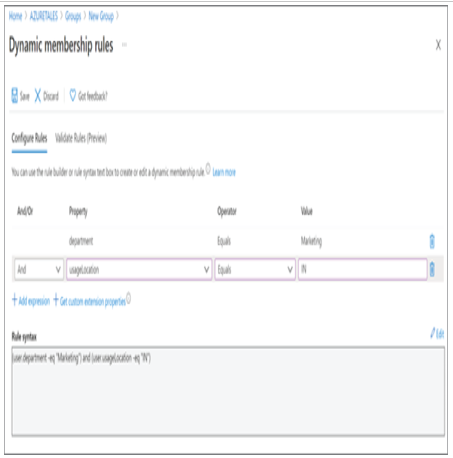
    g. The next option is to define the dynamic query for the user. If you take a closer look at the previous graphic, at the bottom you can see there is an option to add a dynamic query. Click that, and you will be taken to the dynamic membership rules editor.
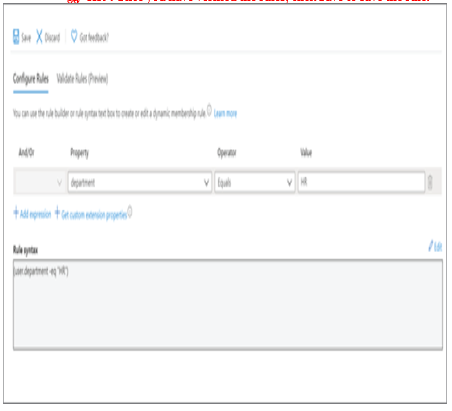
    h. Based on the properties you are selecting, corresponding rules are created. In our example, we are adding the property “department” EQUALS “HR.” We can add more expressions by clicking Add Expression.
    i. Azure Portal will automatically generate the rule syntax based on our selection. The rule syntax for what we selected here is user.department -eq “HR”. Once you have verified the rules, click Save to save the rule.

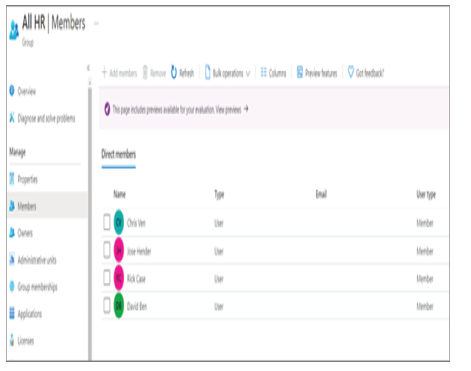
    1. Wait for a couple of minutes, and the members of the group will be automatically added based on the rule you configured.

    4. Let’s try to create another group called India Marketing where we will set up the rule using an additional expression. The final syntax will be (user.department -eq “Marketing”) and (user.usageLocation -eq “IN”), as shown here.

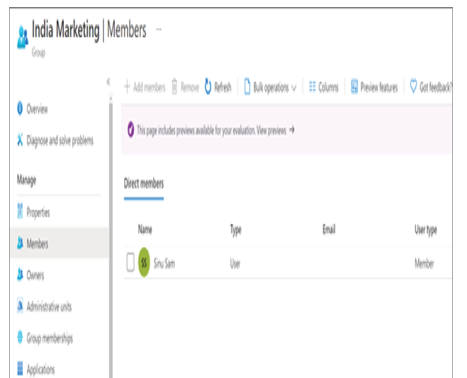
    5. You will see that the members matching the rule are added to the Members blade

      If you completed both the exercises, by now you know how to create security groups and Microsoft 365 groups. Now let’s see how to delete or modify the existing groups.

      Deleting Groups – Identity: Azure Active Directory

      Deleting groups is a straightforward process; however, you need to perform this action with caution because deleting a group in production may cause serious repercussions on access management. Some scenarios where you will need to delete a group include the following:

      • You selected the wrong group type while creating the group. This selection cannot be modified after creation; the only option is to delete the group and re-create the group with the right type.
      • You have a duplicate group.
      • You no longer need the group in your environment.

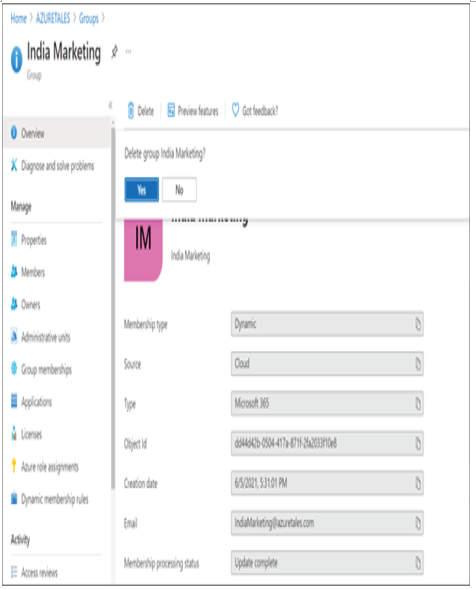
      If you want to delete a group, you can navigate to Azure Active Directory ➢ Groups ➢ All Groups and open the group you want to delete. Clicking the Delete button as shown in Figure 1.6 will delete the group.

      FIGURE 1.6 Deleting group

      Updating details in a group is no different than updating the user properties. You can add or remove users any time from security groups or Microsoft 365 groups with an assigned membership type. However, in dynamic membership groups, you cannot manually add or remove users. The member management is completely managed by dynamic rules that you create. Azure gives you the option to modify the dynamic rules of your existing group without the need to re-create the group.

      Now that are familiar with the user and group accounts in Azure AD, we will talk about the roles in Azure AD.

      Azure AD Roles

      Azure AD roles are used to manage the permissions that can be assigned to users. You can assign roles to users so they can perform certain actions such as resetting user passwords, assigning, or removing licenses, adding, or removing users, etc.

      More than 50+ built-in roles are available in Azure AD so you can follow the principle of least privilege and assign users the permission that they need to complete the tasks given to them. Azure AD roles make sure that the users are not over-privileged or under-privileged with the permissions given to them. For example, if you want to give a user the permission to create/manage groups, create/manage groups settings such as naming and expiration policies, and view groups activity and audit reports, then Groups Administrator is the right role that can be assigned to the user.

      Here is the complete list of roles available in Azure AD:

      https://docs.microsoft.com/en-us/azure/active-directory/roles/permissions-reference

      You can assign roles to the users from the Users ➢ Assigned Roles blade. At the time of authoring this book, assigning roles to groups is in preview. If you would like to know more about this preview feature, refer to this document:

      https://docs.microsoft.com/en-us/azure/active-directory/roles/groups-concept

      We will cover more about Azure AD roles when we discuss role-based access control in Chapter 2, “Compliance and Cloud Governance.”

      We talked about managing users and groups and assigning roles to them. In an enterprise environment, not only users but devices used by users need to be managed and monitored. Azure AD Join helps you to make sure that the devices used by the users follow the organizational standards. Let’s discuss Azure AD Join.

      Azure AD Join – Identity: Azure Active Directory

      Single sign-on is one of the features offered by Azure AD. You can use SSO on devices, apps, and services from anywhere in the world. Joining devices to Azure AD assures the corporate devices are protected and that they follow the compliance standards set by the organization. Users can bring their own devices and join them to Azure AD, and administrators can make sure that these devices also follow the standards of your organization. Now, we will look at the benefits of Azure AD Join.

      Benefits

      Azure AD Join has the following benefits:

      Single Sign-On  This is the primary feature of AD Join; you can sign-in to any of your applications and services without a username and password prompt. The best part is it is not necessary to connect to the domain network to use SSO.

      Enterprise Client Roaming  The settings are synchronized across devices that are joined to Azure AD.

      Microsoft Store for Business  Joining your device and signing-in to the store with work or school accounts gives you a customized catalog of applications that are shared by your organization.

      Windows Hello  This provides you with biometric authentication using facial recognition or fingerprints to access corporate resources and sign-in to devices. The devices should have hardware that supports Windows Hello to use this feature.

      Block Access  Administrators can enforce policies and devices that do not meet the requirements can be easily blocked.

      Let’s see what connection options are offered by Azure AD Join.

      Connection Options

      You can connect your devices to Azure AD using the following options:

      Register to Azure AD  Registration creates an identity for the device, and this identity can be used for authentication. Whenever a user signs in, the identity of the device can be used for authentication. Administrators have the right to enable or disable this identity.

      Join to Azure AD  Joining to Azure AD provides the same features as registration and additionally changes the local state of the device. With a change of local state, users can sign in to their device using their work or school account. Joining is more like an extension to the registration process.

      Combining the registration process with Microsoft Intune (it is a mobile device management [MDM] solution) will help you create conditional policies using the device attribute. Using this combo, you can block devices that do not follow the organizational compliance standards. For example, you could block all devices that are using Windows XP or Windows 7 and make Windows 10 the prerequisite for accessing corporate resources.

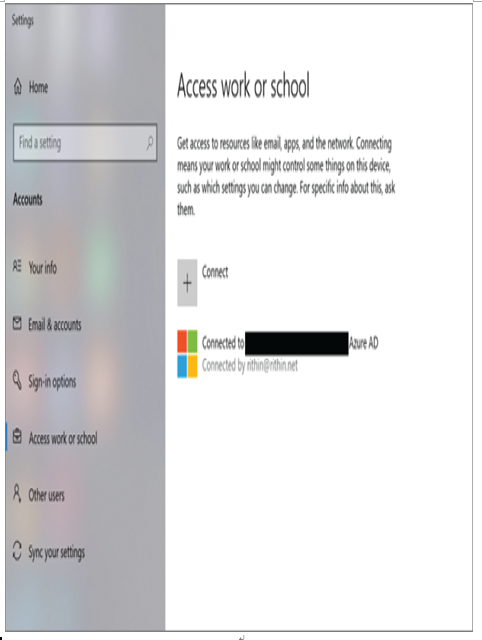
      You could join your device to Azure AD by going to your Windows 10 Settings ➢ Accounts ➢ Access To Work Or School. Signing in with your work or school account will connect your device to the Azure AD domain, and you can sign in to corporate resources using SSO. Figure 1.7 shows how a connected device looks.

      FIGURE 1.7 Connecting a device to Azure AD

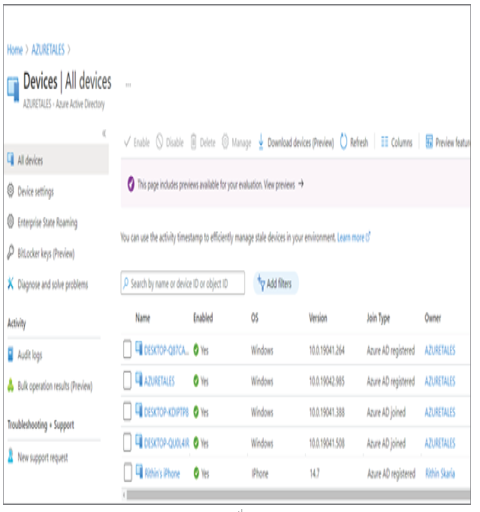
      All the devices that are connected to Azure AD can be explored from the Azure Active Directory ➢ Devices blade. This blade will show OS information, OS version, join type, and owner of the devices that are joined (refer to Figure 1.8).

      FIGURE 1.8 Listing all devices connected to Azure AD

      Now we will talk about a lifesaver for administrators: self-service password reset. Using self-serve options reduces the incoming requests to the IT help desk so administrators can utilize their time for more productive work.

      Self-Service Password Reset – Identity: Azure Active Directory

      If you have worked at an IT help desk, you know most of the calls are for user password reset. Self-service password reset (SSPR) allows users to reset their passwords using a set of authentication methods set by the cloud administrators. Self-service password reset is always enabled to administrators to avoid lock-out scenarios. Admins need to use two authentication methods for password reset.

      Enabling SSPR

      Cloud administrators need to enable SSPR options for users or groups as this option is not enabled by default. To enable this feature, you need to have the Global Administrator role in the tenant.

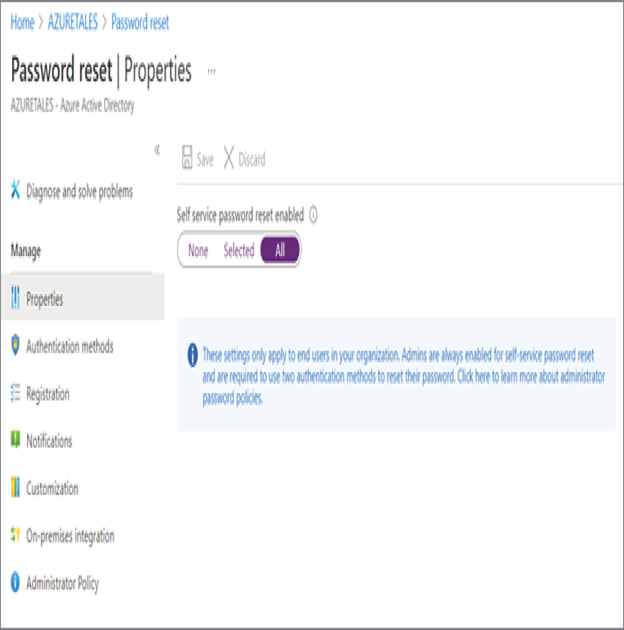
      SSPR can be enabled from Azure Portal ➢ Azure Active Directory ➢ Password Reset. SSPR provides three options (refer Figure 1.9).

      • None: SSPR is not enabled.
      • Selected: SSPR is enabled for selected groups.
      • All: SSPR is enabled for all users in the tenant.

      Once SSPR is enabled, users need to register for SSPR. Azure will automatically redirect users to the registration page on first sign-in after SSPR is enabled. Users can always navigate to https://aka.ms/ssprsetup to set up their authentication methods or to change them in the future. For example, you might have registered with one phone number when you enrolled for SSPR, but you changed your phone number. In this case, you can change it by going to the SSPR setup page.

      FIGURE 1.9 Enabling SSPR

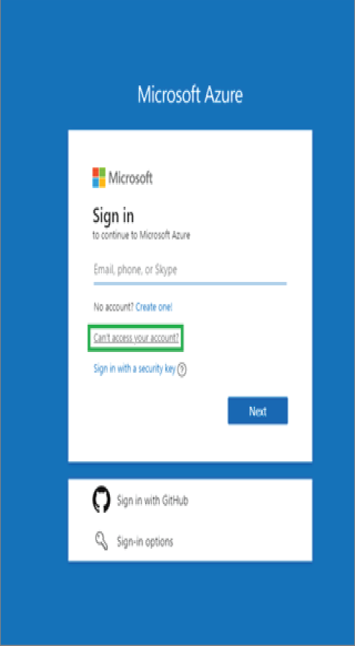
      Registered users can always reset the password from the sign-in page by clicking “Can’t access your account?” as shown in the Figure 1.10.

      It is not necessary that you navigate to Azure Portal to click “Can’t access your account?”; you can navigate to any sign-in page that uses Azure AD login like Office 365, Dynamic 365, SharePoint, etc.

      Users can also navigate to the reset page directly by going to https://aka.ms/sspr. This is an alias for the following:

      https://passwordreset.microsoftonline.com

      Now that you are familiar with SSPR setup, let’s see what authentication methods are available for the users and how administrators can control these methods.

      Authentication Methods

      The administrator can choose the number of authentication methods required to reset the password and the number of methods available for users.

      FIGURE 1.10 Initiating password reset

      For a successful reset operation, you require at least one authentication method. Nevertheless, it is always better to have a secondary method. For example, if you set up SSPR with an email method, and if the user has no email access, then the user will not be able to reset the password. Here, it is better to have a second option like a mobile phone so that the user can receive the code as a text message and complete the authentication.

      Methods available include the following:

      • Email notification
      • Text message to mobile phone
      • Text message to office phone
      • Mobile app notification
      • Mobile app code
      • Security questions

      In the case of security questions, the administrator can decide how many questions need to be registered and how many of them need to be answered to reset the password. Nonetheless, security questions are considered less secure as the answers to these questions can be guessed if the intruder or hacker knows the user personally. Attackers can also collect answers for these questions via social engineering.

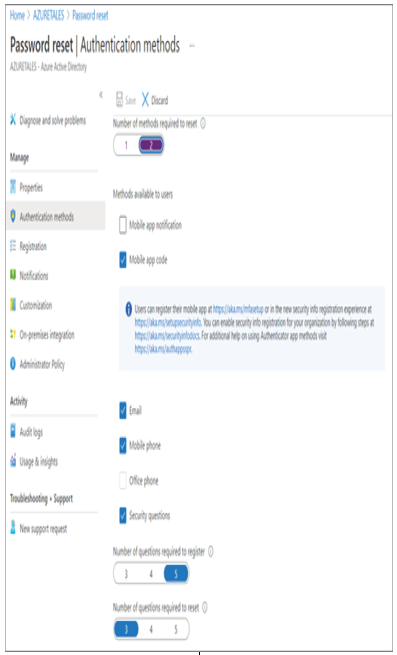
      Authentication methods can be configured from Azure Portal ➢ Azure Active Directory ➢ Password Reset ➢ Authentication Methods (refer to Figure 1.11).

      FIGURE 1.11 Configuring SSPR authentication methods

      So far, we concentrated on a single-tenant environment; in real-world scenarios there will be different tenants, and admins are responsible for the management of these tenants. Let’s see why we need multiple directories and what benefits it provides.

      Managing Multiple Directories – Identity: Azure Active Directory

      Each tenant represents an organization, and it is a fully independent resource. Every tenant that you create is logically separated from other tenants that you manage in a multitenant environment. Even if you are the common administrator for all these tenants, there will not be any parent-child relationship between these tenants or directories. Resource independence, administrative independence, and synchronization independence are there between the tenants.

      Resource independence is when you create or delete a resource in one tenant; this action will have no impact on any other resource in another tenant. However, there is a small exception that we discussed in the case of cloud identities from external AD. By default, Azure AD doesn’t delete Guest users when they are deleted from their home tenant; however, we can set this up manually.

      Administrative independence is when a non-admin user (say the user’s name is John) of tenant A creates a new tenant, say tenant B.

      • John will be the Global Administrator of the tenant B as he created the new tenant. The user will be added as a user from external AD. Here it says external AD, because John is not from tenant B but from tenant A.
      • Administrators of tenant A have no control over tenant B. If the users of tenant A need to access or manage tenant B, then John must invite these users to tenant B and give the necessary role. One thing to note here is that if the admins of tenant A takeover John’s account, they can access tenant B.
      • Adding or removing an admin role in one tenant will not affect the role of the user in the other tenant. Here we’re not removing the user; we are adding or removing the Azure AD roles, which will have no impact on the other tenant, and all roles the user has in the other tenant will be retained.

      When it comes to synchronization independence, you can set up independent synchronization on each Azure AD.

      With that, we have covered all the topics that are within the scope of the exam.

      Summary

      In this chapter, we talked about the identity and access management solution in Azure: Azure Active Directory. We started the chapter looking at the benefits of Azure AD, and then we examined how Azure AD is different from the traditional Windows Server Active Directory deployment.

      As we progressed, we spoke about Azure AD licensing and how administrators can set up custom domains. After that, we learned about user accounts and group accounts. This is a major element of this chapter; understanding user and group management is crucial for cloud administrators. If you are not confident with identity and access management, there can be a chance of security flaws. Security issues are not something welcomed in an organization as they can cause damage to the reputation of the organization, especially when you are dealing with customer data. Along with the impact on the reputation, this can also lead to revenue loss. As an administrator, you should excel in the identity and access management field.
      Then we spoke about Azure AD roles and how administrators should put emphasis on the principle of least privilege. Several other key ideas were reviewed including AD Join and SSPR. You learned about the advantages of incorporating these features in your environment.

      Toward the end of the chapter, we covered multitenant environments and the independence they provide in terms of administration, resources, and synchronization.

      Like with security, implementing governance and compliance is crucial in setting up the environment. In the next chapter, we will cover governance and compliance.

      Azure Regions – Compliance and Cloud Governance

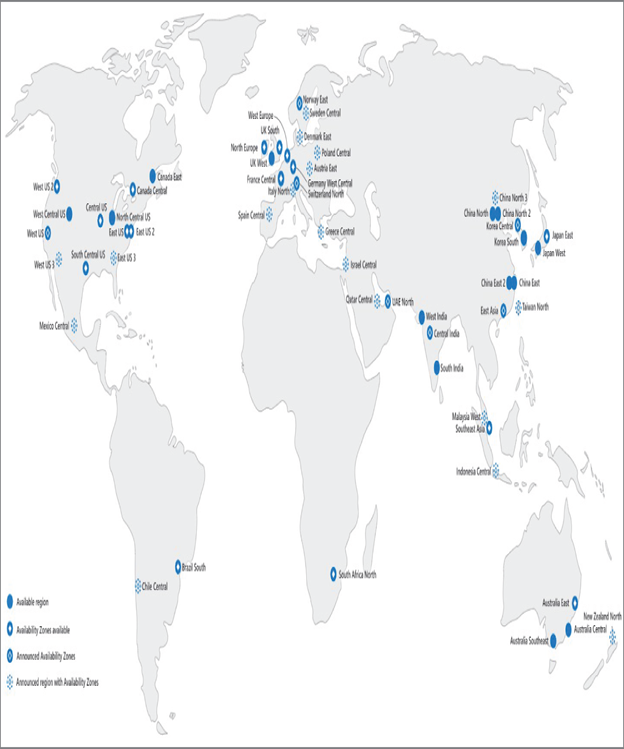
      Microsoft Azure comprises datacenters that are located across the globe. At the time of authoring this book, Azure has more than 60 regions, and there are more in the pipeline. This global presence makes Azure the cloud provider with the highest number of regions. Also, this omnipresence gives customers the ability to choose the regions that are right for them. If you are wondering what an Azure region is, a region is a geographical area on the planet comprising at least one datacenter, but usually multiple. The datacenters are isolated from each other in close proximity and connected to each other via low-latency networks, enabling faster and seamless communication.

      East US, Brazil South, UK South, India West, and Australia Central are some examples of Azure regions. Figure 2.1 shows the list of public regions available for Azure at the time of authoring this book.

      FIGURE 2.1 Azure regions

      Let’s understand some key points about regions.

      Facts

      The following are some of the facts related to regions:

      • Regions offer flexibility for customers to deploy resources to regions that are close to their customers.
      • Regions ensure data residency for customers.
      • Regions offer compliance and resiliency options.
      • When you deploy a resource in Azure, in most cases you will be asked to choose a region.
      • Certain services are region specific, and the availability is limited to some regions when they are launched. Gradually, Microsoft will expand the service to other regions.
      • Services like Azure AD, Azure Traffic Manager, and Azure DNS do not require a region. The region for these resources will be shown as Global in the Azure portal.
      • Each Azure region is paired with another region within the same geography to form regional pairs.

      Understanding these facts will help you plan your resource deployment, choose a region, and understand why you are not able to find a specific service in a region. Let’s shift our focus to regional pairs, which is an important concept in Azure.

      Page 2 of 3

      Powered by Dianne & Theme by Diannehill